Merkle Trees and Creating a Merkle Tree Gift List


Hello and welcome back! This blog post is going to be about week 2 of the Alchemy University Ethereum developer Bootcamp and it will mainly focus on the weekly project like the previous blog post, rather than summarizing the entire week's curriculum. But of course, I will give some information about the things I learned and then I will explain what I did while working on the project.
Merkle Tree
I just want to give you the link about Merkle Trees in Ethereum before start writing it. The most simple and common form of the Merkle tree is the binary Merkle tree where there are always 2 hashes combined to create a new hash starting from bottom to top. You can see a simple figure of it below (Ref: Merkle Tree). You see, it is a tree.
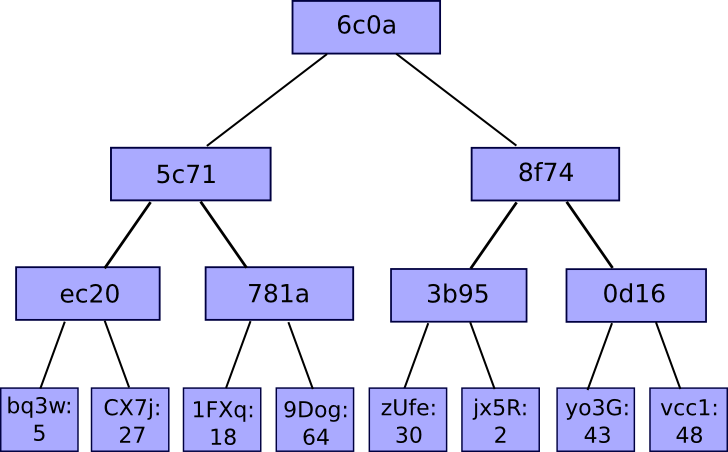
Basically, we are hashing everything two by two, and then we hash the new hashes, and then again and again until there is only one hash left. The hash of the hashes. The ultimate, the super, the last standing one to rule them all -> The Root. We need it, we will use it. It will be somewhere around when we look at it.
Alright, we hash them two by two. But, is it always have to be an even number of data/hash in a Merkle Tree? Apparently, no. According to this document, if a layer has an odd number of hashes, the last hash is doubled. Cool.
Okay, we get that, Merkle Trees are great. It combines everything and stores all of the data in one hash. But why do we need to do that? I mean, a hash is always the same size, right? If we write all the data on a page and then hash the page as a whole, it will be still the same thing in terms of storage. This one too combines everything and stores all of the data in one hash. There is one huge difference. Searching. In the second one, we have to look at the data one by one until we find what we look for but in the Merkle Tree, we can divide and conquer, and we can do it with Merkle Proofs. Yes, you heard it, a new term, again.
You can think of this issue as matching parties or lego pieces (But only two pieces). The item we search for (or the item we want to check if it is in the tree) and the Merkle Proof of that item can be connected together to create the Root of the Merkle Tree. If the root we created is the same as the real root of the tree, that means we proved that item is actually in the tree. Sorry if I explained it like a mess but I will clarify it now:
To prove if some data/hash is actually in a particular tree we need to know 3 things:
The hash we try to check
The Merkle Proof of this hash
The root of that particular Merkle Tree we look in.
The Merkle Proof of a hash is specific for that hash and includes steps to create a root. We take the hash, follow the steps in that hash's Merkle Proof and create a root which is also a hash. This new root we just created and the root of that particular Merkle Tree has to be the same. If not, that hash is not in that tree. And this, guys, is how Merkle Proof works.
Merkle Gift List: Week 2 Project
Now let's start working on this week's project. Actually, this one is much simpler than the previous one and we only need to create a Merkle Tree out of a list, and we need to check if the user input is on the list, that's all.
You can see the project repository in here. We have both the client and server sides again, and we also have the utils file. On the utils file, the Merkle Tree functions and the list of people are already prepared for us. We only need to handle the client and server sides' scripts. These are what we need to do:
Create the Merkle Tree from the list and get the Root.
Ask a user input to get the value that will be searched in the tree.
Get Merkle Proof of that specific value.
Send the required parameters to the server side and verify if the name is on the list on the server side.
const niceList = require('../utils/niceList.json');
const MerkleTree = require('../utils/MerkleTree');

async function main() {
// Create the merkle tree and get the Root.
  const merkleTree = new MerkleTree(niceList);
  const root = merkleTree.getRoot(); //console.log the root and hardcode it to server side.
As you see above, we already have our list and MerkleTree class which were already prepared. We simply assign a merkleTree variable and use the getRoot() method on it to find the root hash. We don't want to pass the value directly but we want to hardcode it. Because the idea here is not "we giving the root hash", the idea is "the root hash is publicly known by a trusted party". The server side already knows the root and will check the user input.
Now, it's time to ask for user input. The app will ask the user to type a name. How will we ask for user input? That's simple. We'll use prompt().
  // Ask user input to get the name which will be searched and be sure it is not null.
  const name = prompt("Which name do you want to check?");
Yep, that's it. Quite simple. But what? I got an error: Prompt is not defined. So what now? I don't want to hardcode a name check it, I need to solve this. If it is not defined, I should define it, right? I just made a quick search and learned that I need to install something called prompt-sync. These are the steps: first npm init, then npm install prompt-sync, and lastly, I had to add const prompt = require("prompt-sync")(); on top of my file. And voila, the app started to ask for user input.
Okay, move on:
  const name = prompt("Which name do you want to check?");
  if(name == null){
    alert("You have to type a name");
  }
  // Find the index of the name and get proof from merkle tree.
  const index = niceList.findIndex(n => n === name);
  const proof = merkleTree.getProof(index);
First, we check if the user typed a name. Then we find the index of that name in the list and we get the Merkle Proof of it. What will it return if the name is not on the list? Did you guess it? If the name is not there it will return -1. And if the index is -1, the proof will be an empty array = [];
Alright, now we have everything we need. You remember we need three things to verify if some data is on the tree, right? Don't you remember? I just told you, exactly two and a half minutes ago. They were: the data, the Merkle Proof and the root. We already hardcoded the root to the server side, we asked for the data from the user and we got the proof from that data. Now, what do we do? We send those values to the server. The server takes these values, prove them and responds to the client side again. Like this:
  // Client side.
  const { data: gift } = await axios.post(`${serverUrl}/gift`, {
    name,
    proof
  });
   console.log({ gift });

/*--------------------------------------------------------------
  Server side */
  app.post('/gift', (req, res) => {
  // Grab the parameters from the client side
  const { name, proof } = req.body;

  // Prove that the name is in the list
  const isInTheList = verifyProof(proof, name, MERKLE_ROOT);
  if(isInTheList) {
    res.send("You got a toy robot!");
  }
  else {
    res.send("You are not on the list :(");
  }
});
Aaaaaaand, that was it. Thank you for reading this all the way down here and I hope to see you in the next blog post. Now it's time for take-home messages for myself :)
Take Home Messages
Merkle Tree is a crucial concept in blockchain and web3, and understanding Merkle Trees and Merkle Proofs is important for someone who wants to be part of this space.
Encounter errors, search and solve them. Don't forget to import dependencies if you want to use some functions.
It turns out that spending more time than I anticipated when trying to understand the client and server-side communication during the previous week's project helped me a lot while doing this week's project. So, don't think you are wasting your time when working on new things.