A Health Care dApp: Proof of Consent
My Final Project for Alchemy University


Hello everyone! It's been a while since my last post. This one is going to be the last blog post in my Alchemy University Bootcamp Blog Series because this is the final project, but I will continue to share my learning journey with some new series. You can find my final project in this GitHub link and follow along if you want.
What is the problem this project solves?
For the final project, students are required to find a real-world problem and create a solution for it. Thanks to my background in healthcare, I was able to find that problem which I'm going to explain to you now.
First of all, there are two major pieces of information for you to know. In medical practice, there is something called informed consent which is extremely important. Doctors have to obtain consent from the patient before any kind of treatment, intervention or surgery. Without consent, it is strictly forbidden to perform a procedure even if that procedure is crucial for the patient's health. The second thing you need to know is that medical malpractice lawsuits are increasing in recent years.
What happens when a doctor encounters a malpractice lawsuit? In case of a lawsuit, doctors have to prove multiple things, for example:
The chosen treatment for that disease/condition was right.
They obtained informed consent for this treatment from the patient.
Okay, great. These were the basic knowledge. Everything to this point is quite normal and there is no problem here, right? The problem starts now!
Consents are in paper form and stored in patients' files in the hospital archives.
Lawsuits might occur after 5 - 7, maybe even 10 years after the initial surgery.
I think you started to see the issue here. Anything can happen to a paper in 10 years, and this might cause serious damage to doctors.
What is my solution for it?
I have decided to create a Soulbound NFT smart contract for this project and also a front-end application for patients to interact with the contract. How is it going to work?
The smart contract is going to let patients mint consent.
The contract is also going to be the clinic/hospital's vault. All the consents minted by the patients will be in the contract (not in the patient's wallet).
The Front-end application will get some input (surgery name, surgery date etc.) from the patient before minting.
The patient's input will be used to create the consent NFT's metadata.
Due to this being a soulbound NFT, consents can not be transferred anywhere else after minting and will stay in the hospital's vault, which is the contract itself, forever.
Smart Contract
Alright! Now everything is clear, you get the idea, I have the plan, let's get to it!
First things first. I need to learn how to create a soulbound token contract. I made some search and it turned out to be quite simple to implement actually. It's a regular ERC721 contract with a tiny change which is below:
function _beforeTokenTransfer(address from, address to, uint256) override internal {
        require(from == address(0), "Token not transferable");
    }
require(from == address(0) in the _beforeTokenTransfer method is enough to create a soulbound token because that "require" statement is never true and the token can not be transferred, ever!
Okay, that was the first part. What else I needed to do in my contract? I used the OpenZeppelin contract wizard for this and then added a little bit more stuff to it. You can see most of it below, and I will continue explaining it.
// Create Surgery and Patient structures
    struct Surgery {
        string surgeryName;
        uint surgeryDate;
        address patientId;
    }

    struct Patient {
        address id;
        Surgery[] surgeries;
    }

    // Create a mapping for each address to a Patient structure.
    mapping(address => Patient) public patients;
    event SurgeryAdded(string surgeryName, uint surgeryDate, address patientId);

    // Function that updates the mapping and storage.
    function addSurgery(string memory _surgeryName, uint _surgeryDate) public {
        Surgery memory surgery = Surgery(_surgeryName, _surgeryDate, msg.sender);
        patients[msg.sender].id = msg.sender;
        patients[msg.sender].surgeries.push(surgery);

        emit SurgeryAdded(_surgeryName, _surgeryDate, msg.sender);
    }

    function safeMint(address to, string memory uri) internal {
        uint256 tokenId = _tokenIdCounter.current();
        _tokenIdCounter.increment();
        _safeMint(to, tokenId);
        _setTokenURI(tokenId, uri);
    }
With this code, I've created Surgery and Patient structures, a mapping for every address to a Patient, an event, and a function called addSurgery(). The safemint() function was already created by the wizard. I will explain the front-end part of my project in detail later but for now, I should say that there is a "mint consent" button which was calling both the addSurgery() and the safeMint() function at the same time when clicked. It was working and I was able to call two functions with one click as I wanted but there was a problem: I had to sign two times because it required two different transactions. It was an easy fix though: I updated the addSurgery() function which can call the safeMint().
// The safeMint() function is called inside the addSurgery()
// The parameters for safeMint() should be given to addSurgery()
    function addSurgery(string memory _surgeryName, uint _surgeryDate, address _to, string memory _uri) public {
        Surgery memory surgery = Surgery(_surgeryName, _surgeryDate, msg.sender);
        patients[msg.sender].id = msg.sender;
        patients[msg.sender].surgeries.push(surgery);

//-------- This was the change! ---------
        safeMint(_to, _uri);

        emit SurgeryAdded(_surgeryName, _surgeryDate, msg.sender);
    }
This solved my problem and I was able to call both of the functions with one transaction and therefore with only one signature. Amazing! Let's try it aaaaand see this:
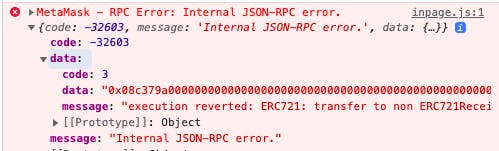
Please check the message. Execution reverted. ERC721: transfer to non erc721receiver implementer. What? Errors. Errors everywhere. Let's ask uncle Google.
It turns out that if I want to create a smart contract that can store NFTs, I had to implement IERC721Receiver. If not, a contract can not receive NFTs and the transaction will be reverted. I want my contract to be the hospital's vault and get NFTs. So how to implement this thing?
The smart contract must have onERC721Received method and this method has to return its selector with IERC721.onERC721Received.selector. You can check this OpenZeppelin repo, and the one below is my implementation.
 // This contract will be the hospital vault and has to have onERC721Received function.
 // If this function is not implemented, contract can not receive tokens.
    function onERC721Received(
        address,
        address,
        uint256,
        bytes memory
    ) public virtual returns (bytes4) {
        return this.onERC721Received.selector;
    }
After this one, everything was working fine. I also have the checkSurgery() function but I'm not going to go into details about the smart contract, the most important parts were these. Let's move to the front-end.
Front-End Application
Before building the client-side application I had to make a plan. What should my app do? What features do I want to add?
It should provide a wallet connection.
It should have two different pages: One for giving consent and one for checking already given consents.
It should be able to get input from the user(patient).
It should not let the patient proceed if the required input is not given.
It should use the given input to create NFT metadata.
Lastly and obviously, it should be able to interact with the blockchain.
If you were following my blog series about this bootcamp, you might know that I learned how to handle most of these issues. For example, I explained how to manage wallet integration in my ERC20-indexer app blog post. Maybe if you check my ethereum block explorer post, you can see how I learned to navigate between pages and the fundamentals of React Router. Thanks to my previous struggles and efforts, I was able to create a basic front-end application, except for one issue. The biggest and newest challenge for me while creating this app was creating NFT metadata with user inputs.
How to create NFT metadata with user inputs?
It's extremely important to understand the metadata standards. You can also check Alchemy's docs. Metadata should be a JSON object and structured like this:{"description": "YOUR DESCRIPTION","external_url": "YOUR URL","image": "IMAGE URL","name": "TITLE","attributes": []}
It was obvious that I had to structure that object with different variables using the patient's inputs. Okay but, then what? That's not enough. I had to assign this object to the token itself. How? Here comes the IPFS, the savior.
IPFS helps to store values in a distributed way. When we upload a file to the IPFS, we get a hash called CID, and if we type ipfs://cid, we can get that content. By the way, this ipfs://cid is our tokenURI in the smart contract.
I hope I explained it in a simple way but even if it's still complicated, don't worry, you can get it with a few examples below. After I learned all of these, I decided to create my metadata object. Typed the description, name etc. Created an image (I used Canva for this) for my NFT and uploaded it to the IPFS. ifps.io/ipfs/QmYdgGnNEqvnTmHRpUQXmWndSEHhxSu4pPyrQSTjKch3eU. If you copy-paste this, you can see my NFT image. But be careful, this is only the image that will be used for the token, not the full metadata of the token. I uploaded the image to the IPFS directly but I also had to upload all metadata too. Nested IPFSs. Up to this point, my code was like this:
// Create an object that includes the user inputs. (surgery, surgeryDate, surgeryTimestamp are these inputs)
let metadataObject = {
     description: "This is the proof of consent for the surgery detailed in the attributes section below.",
     external_url: "https://osmanozdemir.hashnode.dev/",
     image: "https://ipfs.filebase.io/ipfs/QmYdgGnNEqvnTmHRpUQXmWndSEHhxSu4pPyrQSTjKch3eU",
     name: "Proof of Consent",
     attributes: [
         {
             trait_type: "Surgery Name",
             value: surgery
         },
         {
             trait_type: "Surgery Date",
             value: surgeryDate
         },
         {
             display_type: "date",
             trait_type: "Surgery Date",
             value: surgeryTimestamp
         },
         {
             trait_type: "Patient Id",
             value: account
         }
    ]
}

// Convert that object to JSON string which will be the token metadata.
const metadata = JSON.stringify(metadataObject);
Uploading an image was easy, you can directly upload a file with Filebase or Infura. But, how could I upload the metadata object to the IPFS with JavaScript when a button is clicked on my app? That's the question. Apparently, there is a library for it, which is ipfs-http-client. I needed to set up an Infura account, which will give me an infura_id and infura_secret_key. With those two values, I generated an authorization string, saved it in the .env file and used it for the IPFS setup. Check it below:
import { create } from 'ipfs-http-client';

// Create IPFS node and upload the metadata to IPFS.
// auth is generated with infura project id and key.
const auth = import.meta.env.VITE_AUTH;
const ipfs = create({
    host: 'ipfs.infura.io',
    port: 5001,
    protocol: 'https',
    headers: {
       authorization: auth,
    },
});

// Upload the metadata to the IPFS and get the "cid"
const { cid } = await ipfs.add(metadata);
console.log("cid: ", cid.toString());

// Assign cid to tokenURI
const uri = "ipfs://" + cid.toString();
After completing all of these I tried to upload JSON metadata to the IPFS to see if it was working. What do you think? Is it working or another error?
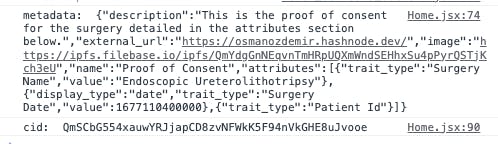
Unbelievable. It was working :) I could get the cid from the IPFS. (By the way, I got many errors while trying to set up the ipfs-http-client)
Amazing! That was the toughest part. Now it's time to create a contract instance and call the function in it. Not a big deal :)
// create an JSON RPC provider
const alchemyProvider = new ethers.providers.JsonRpcProvider(import.meta.env.VITE_JSON_RPC)

// Create an instance of the ProofOfConsent Contract
const contractAddress = "Your deployed contract address";
const instance = new ethers.Contract(contractAddress, ProofOfConsent.abi, alchemyProvider);
//-----------------------------------------------

// This part is inside the minting function and the parameters are obtained from the patient's inputs.
// Call the addSurgery function in the contract
    const tx = await instance.connect(signer).addSurgery(surgery, surgeryTimestamp, contractAddress, uri);
Phew! It was a long ride. You can see the give consent page of my app before and after the inputs were given down below.

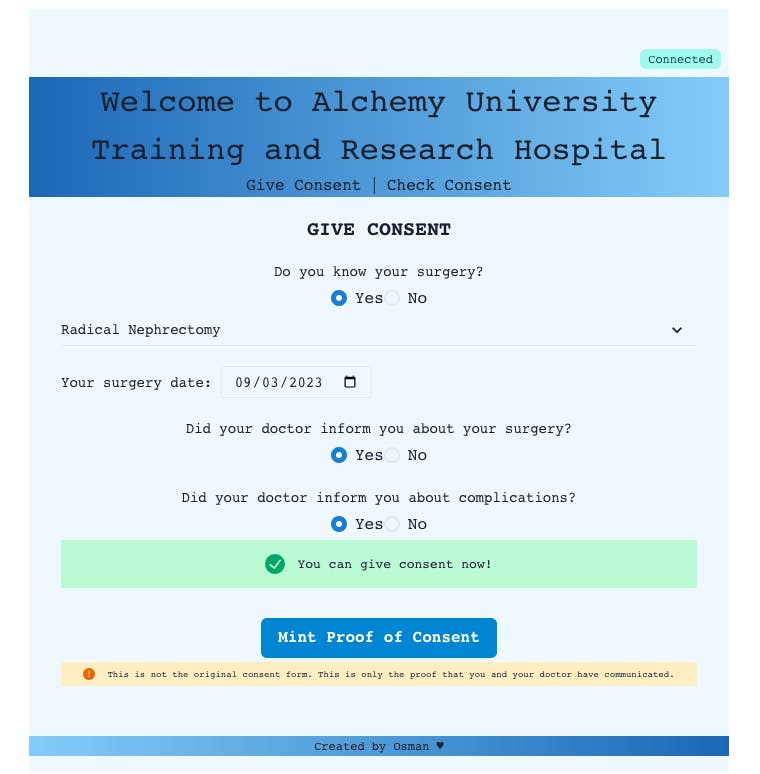
If the surgery name or date is not given by the user or the questions are answered "no", the app won't let the patient mint consent. After minting, I could see the attributes on the Opensea testnet. Check this out!

What about the check consent page? I know it's already too long, but there is one specific thing I want to mention and I'll finish it. Here is the check consent page.
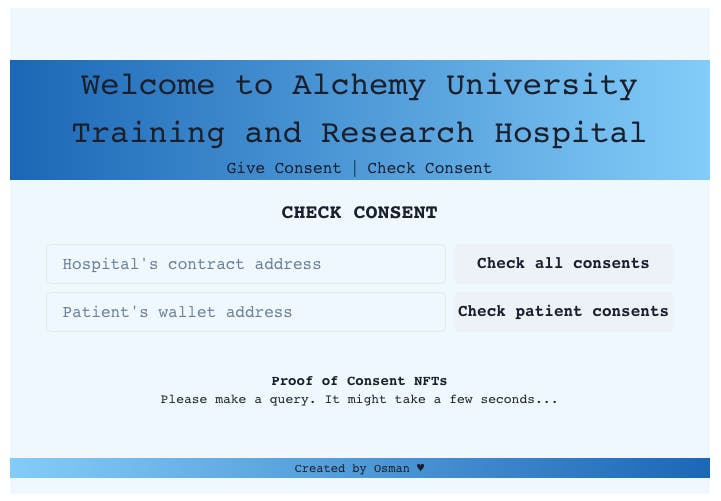
You can see there are two buttons. One for checking all the consents of the hospital and the other one for specific patients. The thing is that all of the consent NFTs are owned by the hospital. Not a single consent is owned by a patient. Therefore it is impossible to use getNFTs method from the Alchemy like this: const data = await alchemy.nft.getNftsForOwner(address); Because patients are not the owners of these NFTs, they are only the creators. If a patient needs to see a consent created by himself/herself, they have to type the hospital's address too. This way I could get all the consents of that hospital and then search for the patient's wallet in them. It was a bit tricky to handle and I just realized there might be better ways to do it, but I won't go in there. You can check it on GitHub.
Future Implementations
This was a basic healthcare application and some features might be implemented to improve this app.
Burning is the next step in this application but there are a few things to consider while creating the burn feature. As usual, the owner can burn an NFT but in this application, the owner is the hospital. The creator of the NFT should be able to burn it, not the owner. I already have an idea to solve this.
Another thing is that the burning has to be before the surgery date.Encrypting Metadata is also extremely important. Blockchain is public and in the current situation, everyone can see which address has a surgical operation on which date. Encryption of these valuable medical data and giving the key to the hospital, which can use this data when a lawsuit occurs, is important.
Patient Id. I used patients' wallet addresses as IDs but it can easily be implemented.
Acknowledgments
This is a prototype application that solves a real-world problem in theory. But in practice, it is impossible to use it in the real world, for now. Because:
It requires every patient to have a crypto wallet to sign consents. That means mass adoption of crypto and we are far away from there. We can not simply expect a 65-year-old patient to have a crypto wallet.
It also requires more advanced mobile crypto wallets. We can not expect patients to use a hospital ward's front desk computer to sign a transaction. What if that computer is compromised? We need better mobile wallets which are being developed but are not there yet.
Last Words
It was an amazing journey to take this bootcamp and push myself as much as possible. I want to thank the Alchemy team. Vitto, Albert Hu, Al, Dan and everyone else who put effort into this educational material deserves huge thanks.
This was the last blog post about the bootcamp and you can check the other posts in the series. I will continue to share my learning journey with new materials and hope to see you there.